GoCardless configuration
Please read all the articles in this section to get started with Your GoCardless.
After you’ve created your account on GoCardless you will need to create your Access Token and Webhook.
To create the access token from the GoCardless panel click on “Create an access token” and:
- Name: Write “My Website” or your website name
- Scope: Select “read-write access”
Finally click on “Create access token”. It is essential that you write down the access token somewhere because it will be useful in the future.
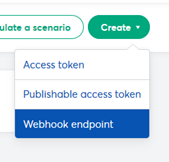
To create the Webhook click on “Developers” from the left menu. On top-right of the page click on “Create > Webhook endpoint”:
- Name: Write “My Webhook” or your website name
- URL: Type in “https://YOURWEBSITE/wc-api/yps_gocardless” where “YOURWEBSITE” will be the domain of your website.
- Secret: Digit a long secret password. You will need to paste this password inside the “Webhook Secret” of the “Your Plugin GoCardless Settings” so write it down somewhere.
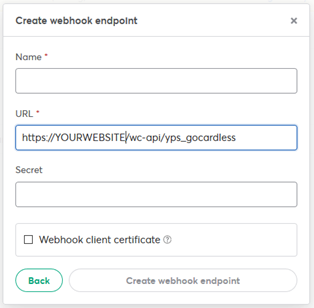
Click on “Create webhook endpoint”.
Now you have everything you need for next steps.
WooCommerce configuration
It is now time to configure WooCommerce to get GoCardless payment. Click on WooCommerce > Settings > Payments.
Click on “Manage” on right of “GoCardless“:
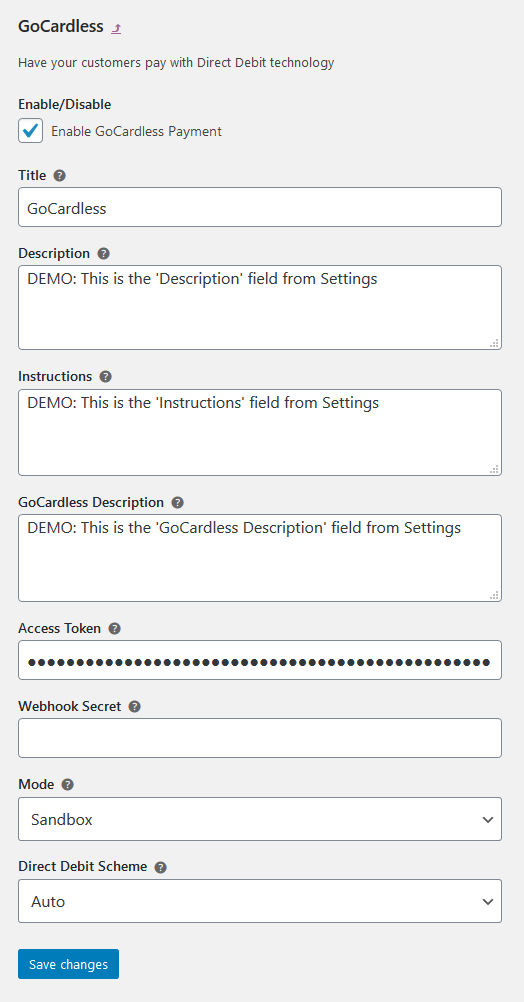
- Enable/Disable: Show/Hide the payment method on checkout
- Title: This title will be shown in your checkout.
- Description: This description will be shown in your checkout under the GoCardless selection box.
- Instructions: This is a text that will be shown in your thank you page after the payment has been made.
- GoCardless Description: A description you can show inside the GoCardless page.
- Access Token: The access token you got from GoCardless.
- Webhook Secret: The secret you have wrote on GoCardless.
- Mode: Sandbox is test mode, Live is production mode.
- Direct Debit Scheme: Leave auto if you want to let GoCardless decides the right schema of payment (By checking the billing country of your customer). Change it if you would like to force the debit scheme.
Click on “Save changes”.
Sandbox first of all!
It is always a good idea to first test your new payment method with a sandbox environment and check if:
- You can pay
- You receive confirm of payment on WooCommerce
You can login in your sandbox here: https://manage-sandbox.gocardless.com
Instructions how to create the Access Token and Webhook are the same of the previous articles: Remember to set “Mode” => “Sandbox” and change your “Access Token” and “Webhook Secret” on WooCommerce.
When you are ready you can test on your front-end website.
Go live!
Everything is ready and you just need to change “Mode” => “Live”, Access Toekn and Webhook Secret on WooCommerce.
It is always a good idea if you do a first live test. You will be the first customer of your website!