Installation
- Download the ZIP file from your My Account area
- Load the ZIP file in your WordPress website by clicking on Plugins > Add New > Upload Plugin and activate the plugin.
The free version of the plugin must be installed and activated.
Let’s start
To create your first WooCommerce notice using Your WooCommerce Conditional Cart Notices you need to:
- Create your message template
- Create your notice
Create your template
To create your message template click on YourPlugins > WooCommerce Conditional Cart Notices, then click on Notice Templates > New Template.
Here are the explained template settings for Template Basic Settings:
- ID: The identifier of the template
- Name: The template name
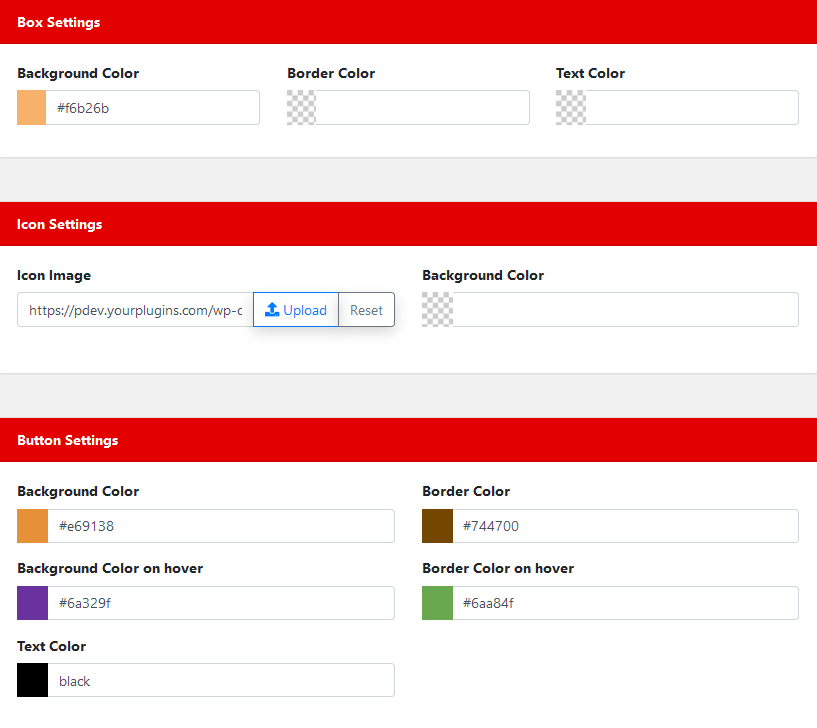
Settings for Box Settings:
- Background Color: The background color of the notice
- Border Color: The border color of the notice
- Text Color: The text color of the notice
Settings for Icon Settings:
- Icon Image: You can upload or choose an image from your WordPress gallery by clicking on Upload. If you want to remove the image click on Reset.
- Background Color: The background color is only related to the icon
Settings for Button Settings (Call-To-Action):
- Background Color: The background color of the button
- Border Color: The border color of the button
- Background Color on Hover: The background color when the mouse hover the button
- Border Color on Hover: The border color when the mouse hover the button
- Text Color: The text color of the button.
When you have finished editing the template options click on Save.
Create your notice
To create your notice click on the Notices tab, then click on New Notice, here is a description of the settings.
Settings for Notice Basic Settings:
- Name: The name of the notice
- Enabled: If yes the notice will be shown when conditional rules are met
Settings for Notice Rules:

- Rule: Here you can set your rules by clicking on Add Rule. If you want to add a group of rule you can click on Add Group. Check the list of rule types.
Settings for Total Amount Settings:

- Include Coupons in “Total Amount”: If yes coupons amount is included in the “Total Amount”.
- Include Coupons Taxes in “Total Amount”: If yes coupon taxes are added to the “Total Amount”.
- Include Taxes in “Total Amount”: If yes the taxes are added to the Total Amount
- Include Shipping Taxes in “Total Amount”: If yes shipping taxes are added to the Total Amount
Settings for Appearance Settings:
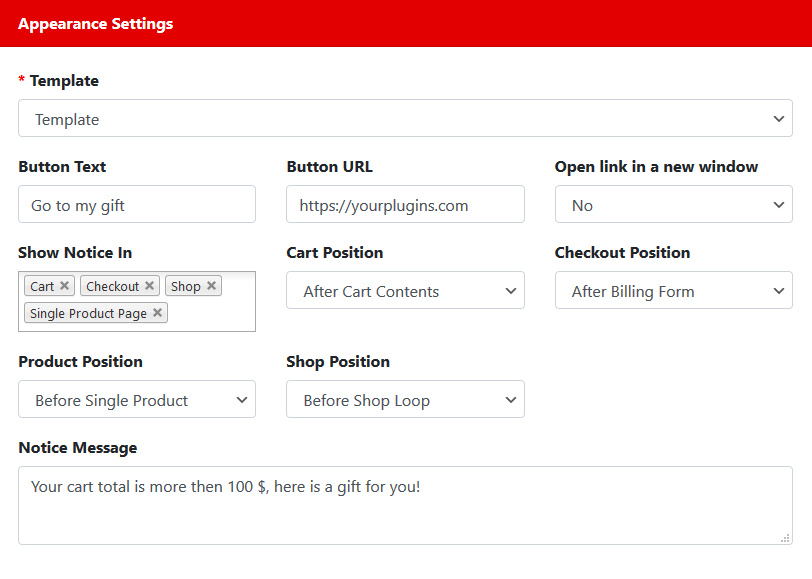
- Template: The template you have created in the previous step
- Button Text: If you want to display a button (The Call-To-Action) add some text here, otherwise leave empty
- Button URL: Destination page when the button is clicked
- Open link in a new window: If yes and button is clicked it will open the page in a new browser tab, otherwise the page will be opened in the same browser tab.
- Show Notice In: The pages you would like to show the notice. You can display notice in Cart, Checkout, Shop, Single Product Page
- Cart Position: Where the notice should be displayed in the cart
- Checkout Position: Where the notice should be displayed in the checkout
- Product Position: Where the notice should be displayed in the product page
- Shop Position: Where the notice should be displayed in the shop page
- Notice Message: The message/notice to display
When you have finished editing the notice options click on Save.
Rule Types
Here is the list of the rule types you can set in order to show or hide your notices:
- Price: The price of the product
- Products: You can select only some particular products to be considered in the cart
- Categories: You can select only some particular categories of products to be considered in the cart
- User Roles: The different type of user roles in your website
- User Types: Logged-in users, Not logged-in users
- Billing Country: WooCommerce billing country
- Shipping Country: WooCommerce shipping country
- Start Date: You can set up a start date to show/hide the notice
- End Date: You can set up a end date to show/hide the notice
- Product Quantity: Quantity of a product in the cart
- Total Quantity: Total quantity in the cart
- Total Amount: Total amount in the cart
- Total Net Amount: Total net amount in the cart
- Total Taxes: Total taxes in the cart
- Shipping Total: Total shipping taxes in the cart
- Total Coupon Discount Amount: Total discount amount in the cart
- Referrer URL